Lorekeeper Sysadmin Quest
Last Updated: Nov 2, 2024Introduction
Lorekeeper is a weird project, even barring the whole "what is a closed species masterlist" thing. In short, it's a platform for artists to create interactive, community games.
It's designed to be as friendly as possible to people who have never hosted a website before, and as I saw someone describe once, "it isn't actually one project, it's one project with a thousand forks and you have to keep downstream in mind at all times".
Because it's designed to be as simple as possible, most Lorekeeper servers (including mine) are just straight up locally installed on either Dreamhost or an Ubuntu droplet. No containers, no nothing, just old fashioned serving out of /var/www (or the home directory, in the case of Dreamhost) with a really basic git hook deployment setup.
I manage over a dozen ubuntu servers for my Lorekeeper managed hosting service. As a solo dev, I’ve really started to struggle with scale -- individually SSHing into each server to execute bespoke commands isn’t cutting it anymore. Every time you do a deployment for Lorekeeper, you have to run a slew of commands (composer update, artisan migrate, add-site-settings, optimize usually twice, whatever other special commands required).
It sucks and it's consuming all of my free time. I like providing this service, though, so I want to make it suck less.
Here's the tale of me attempting that.
A Word of Caution
While I have written this guide in as plain language as possible, this is not a beginner friendly guide.
You should have a basic understanding of networking and Linux systems. Full disclosure, I learned a lot of this on-the-fly. However, if you're coming from a basic Lorekeeper background, you may struggle with this content.
This isn't web developer or coding stuff -- this is system administrator stuff. System administration is a whole different skillset. You could make a whole career out of it alone.
That said, I would love to see other people try their hand at this kind of thing. Please reach out if you try out a similar setup, and if you have any suggestions on how to improve this guide!
What I Needed
First, I had to solidify my actual needs. I needed a way to:
- Control all my servers from one place (maintenance stuff like apt update & upgrade).
- Deploy my code and execute all necessary deployment commands with (functionally) one or two button presses.
- A safe and secure database solution with regular backups that I can easily access from one place.
- A way to serve transactional emails for all sites in one place, rather than disparate (and fragile) Sendgrid/Mailersend/etc accounts.
Also, for any of these solutions, I need it to be:
- Accessible from any of my computers, and to anyone I might hire in the future to help me with my work.
- Self-hosted and open source/free (I'm on a budget, and I want everything to be as centrally located as possible)
What I Did
I’m going to break this article apart into a series on how I set up each aspect of the structure specifically:
- Security: Cloudflare Tunnels & Access Groups
- Server Control: Rundeck
- Code Storage/CI: Forgejo & GitHub
- Mail Service: Mailcow
Securing Infrastructure (Cloudflare Tunnels)
Let's address the security concern first. There's a lot of complicated solutions out there for private VPN proxy nonsense. I'm not going to pretend to understand any of them, and I don't trust myself to do any of them correctly. I'm not a cybersecurity expert.
So, I settled on securing all of my services with Cloudflare Zero Trust. Basically, that allows me to put everything behind a login page where I can specify whatever authentication requirements I want. Notably, you can do all this for free (aside from the buying a domain part).
Prerequisites:
- A Cloudflare account
- A domain name that you either purchased via Cloudflare or is set up to use the Cloudflare nameservers
- Some knowledge of how Docker works -- enough to copy paste a docker compose and run it. Here's a guide from Docker themselves on how to install all the necessary stuff on Ubuntu.
Cloudflare Tunnel
First, we need to create a Cloudflare tunnel with the services we want to access. You can either install the Cloudflare service locally, or use a container. I opted to use the container solution, and just make all my infrastructure containerized in general. The problem with using it locally is that there wasn't really an easy way to stop access to the outside world via IP (I experimented with Nginx reverse proxies for about six hours before giving up). So I just opted to containerize everything.
Here's the basic structure of a docker-compose file for Cloudflare tunnels:
services:
    tunnel:
      container_name: cloudflared-tunnel
      image: cloudflare/cloudflared
      restart: unless-stopped
      command: tunnel run
      environment:
        - TUNNEL_TOKEN=${TUNNEL_TOKEN}

networks:
    default:
        name: tunnel
Create an .env file in the same directory as this docker-compose:
TUNNEL_TOKEN=whatevercloudflaregaveyou
For some reason Cloudflare won't just give you the stupid token, so you'll have to copy this and then wrangle the token out of it:

Basically we only serve the app "locally" on the docker network, so it's only accessible within the docker network. The Cloudflare tunnel then exposes that stuff to the greater internet, and the Cloudflare access group. You did it correctly if you go to [your IP]:[your port] and the connection times out, but you can still access it via the URL defined in the Cloudflare tunnel.
By the way: if you just spun up a container and you're getting a 502 Bad Gateway, just give it a bit. Sometimes it takes a while for everything inside the containers to spin up (especially Rundeck, which will come up later).
Cloudflare Access Application/Group
Next, you need to set up the access application. This is what does the actual securing — adds the “login” page in front of your website.
- First, create a new application here:

- Select "Self-Hosted", then fill out this section for "Configure Application". Everything else can be left as default.
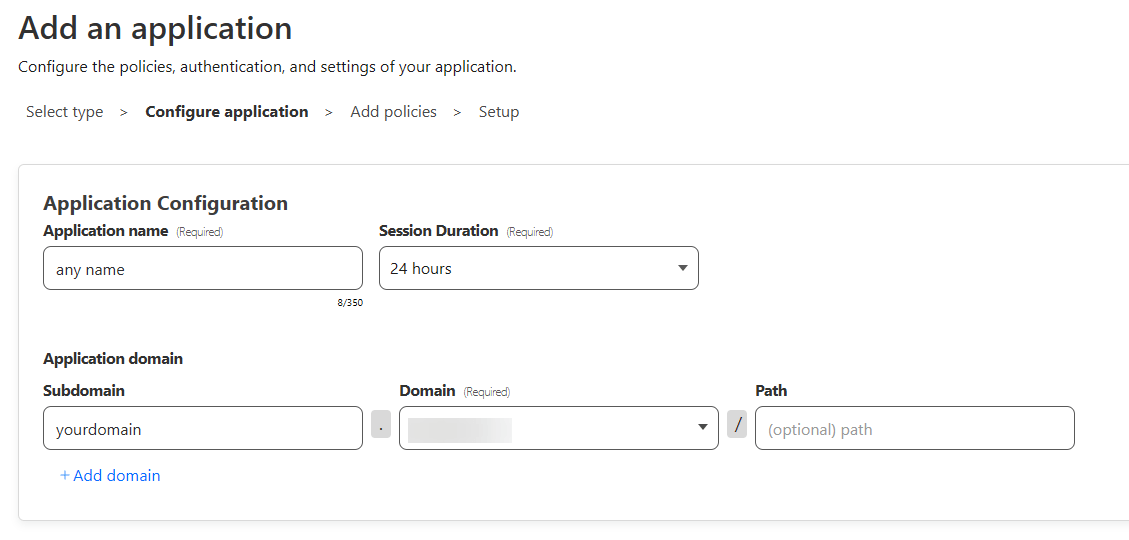
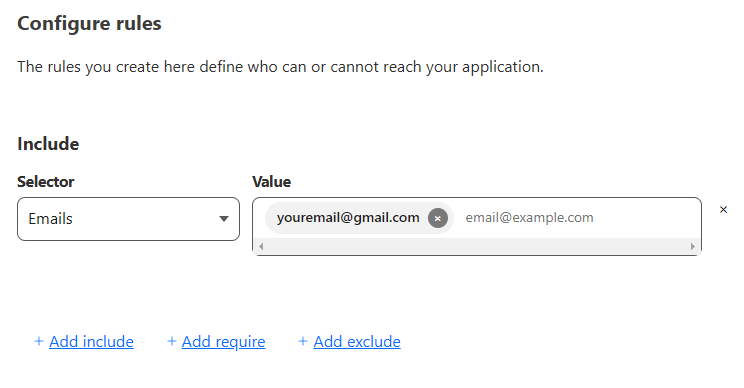
- You'll be presented with the "Add policies" screen. You can name your policy anything you'd like, and then select "Allow". Notably, we'll want to scroll down to "add additional rules".
This is what I consider the most straightforward setup, that isn't reliant on authentication via other websites:
- Create your application, then go back to the Policies tab and select "Add a policy".
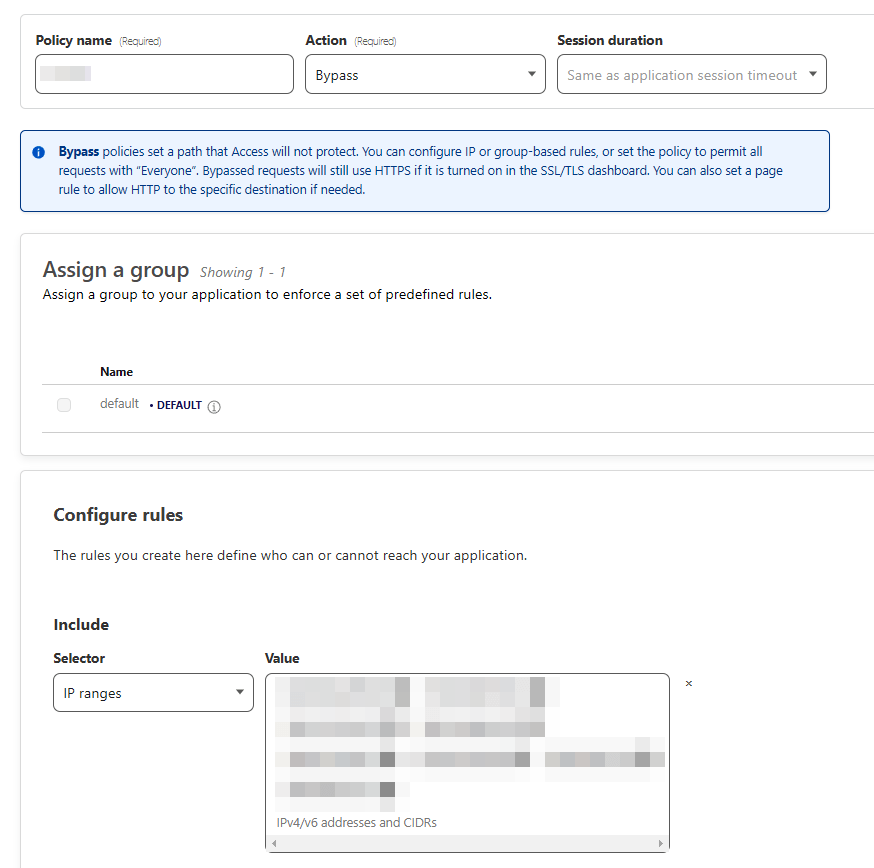
- We want to create a second policy for our application, set as "Bypass" instead of "Allow".
Enter in the IP of your website, and any other IPs that your applications may need. (For example, I had a git forge behind a Cloudflare tunnel, and I needed to add GitHub's IPs to bypass the block.)
- Finally, we want a third policy for our application. This one will be "Block", and the additional rules will be "Everyone". Like so:
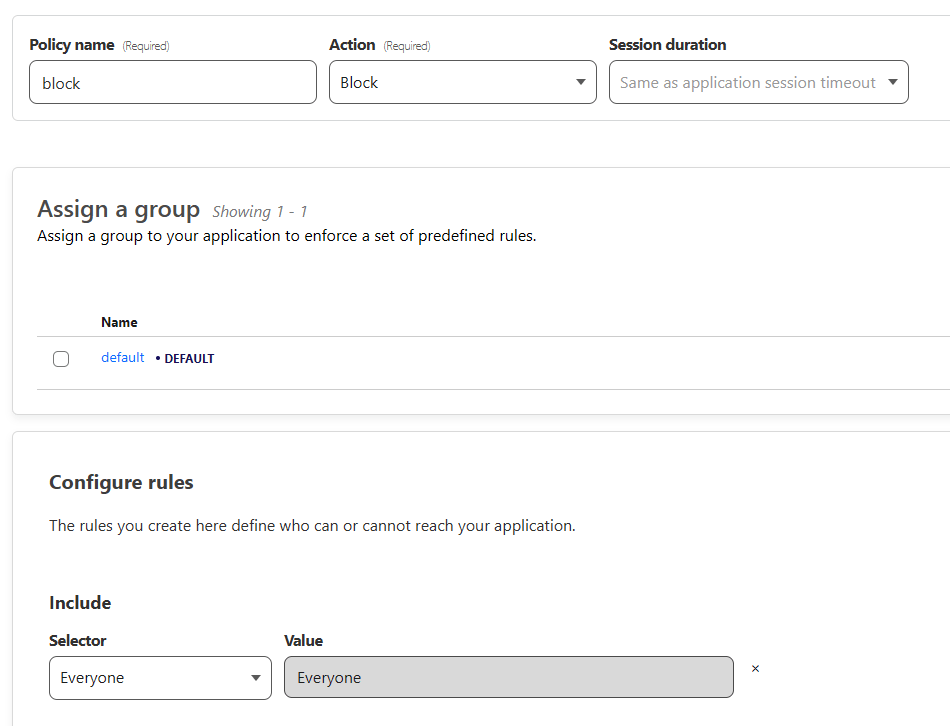
This policy will allow you to log in, your server IPs to bypass the tunnel, and block everyone else from accessing your site!
And now we have to actually find services to connect to the tunnel. So here we go...
Control Server (Ansible, Rundeck)
The one thing I knew before going into this adventure was that Ansible was probably going to be the solution to a lot of my problems. It's essentially a piece of Python software that reads a .yaml file of instructions, and performs those instructions on a remote server.
I installed Ansible directly onto a droplet and found it... useful, but clunky. Ansible is more or less just a python library to read yaml files. I realized I wanted visuals -- something with a GUI and buttons.
So I tried Semaphore. In short, it took forever to get work, and I hated it. You can't run ad-hoc commands, which is a big thing I wanted. It's basically just a visual playbook repository, which is cool, but still not what I actually wanted.
Then I finally tried what was in front of my face the entire time, because I use it at my day job -- Rundeck.
Configuring Rundeck
There is a lot of ways to get Rundeck going. The target audience is more Big Corporate than one solo developer, so most of the guides you'll find are completely with that in mind, aka, more or less useless.
To save any future people 3-4 days of guesswork, I have a "cloudflare-ansible-rundeck-postgres” dockerfile and docker-compose available at my GitHub here. You will need the Dockerfile to ensure Ansible is installed within Rundeck. Configure the relevant environment variables in an .env file next to the docker-compose.yml.
I ran Rundeck on its own droplet. I recommend you do the same. Rundeck hogs a lot of RAM, and adding additional services alongside it can complicate the tunnel setup. There's no downside and it can share the same access group as any of your other services. I have it on the $18/month Regular Intel from DigitalOcean, but you might be able to get away with less.
The default login for Rundeck is admin with a password of admin. You can change this login by going into the container's shell and running these commands.
For some reason when you go to log in it won't actually redirect you. That's fine. Just go back to the base URL and you'll find yourself logged in.
Now for the fun part: adding nodes and writing jobs!
Adding Rundeck Nodes
"Nodes" are what Rundeck calls all the servers you want to connect to.
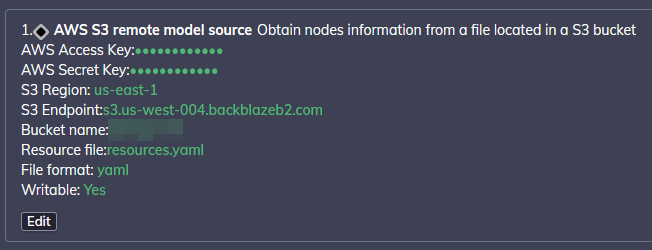
Initially, I was using a local .yaml file that I mounted to Rundeck in the docker compose file. However, you can't edit the file within Rundeck that way (or at least, not reliably). So I ended up actually tossing the file on my BackBlaze B2 account that I use for storing backups as an "AWS S3 remote model source".
You can make a 10 GB BackBlaze B2 account for free. It's also the place I'd recommend for storing your site backups, which you ought to set up anyway.
This is what my config looked like:
And this is an example configuration for a given node in .yaml format:
[NODE NAME]:
  osFamily: unix
  osArch: amd64
  description: [SITE URL]
  osName: Linux
  url: [SITE URL]
  tags: client
  nodename: [NAME OF SERVER]
  hostname: [YOUR SERVER'S IP]
  osVersion: 5.11.0-7612-generic
  ssh-key-storage-path: [PATH TO YOUR RUNDECK ACCOUNT'S SSH KEY]
  sudo-password-storage-path: [PATH TO YOUR RUNDECK ACCOUNT'S SUDO PASSWORD]
  sudo-command-enabled: 'true'
  username: [USERNAME FOR RUNDECK TO USE]
For each node, you have two options:
- An exactly identical user account for Rundeck to connect to on all your servers. This means the same SSH key, the same sudo password, and the same username.
- With the above configuration, you can define unique logins for each site. This gets to be a hassle with Ansible playbooks, but it's objectively more secure.
No matter which option you go with, you will upload the SSH key and password into Rundeck's Key Storage. That will be the "path" for your SSH key/sudo password in the future.
After adding a node (or two), go to the "Command" section on the right hand side. Type in name: [NAME OF YOUR NODE] for the node search and type in whoami for the command. If everything went well, you should see it respond back with the Rundeck account's username!

As of this writing, there is a major glitch with the current version of Rundeck. You can not execute sudo commands via bash without passwordless sudo. Do not set up passwordless sudo unless you know what you're doing. There are other workarounds, but they are highly technical. In the interim, you can use Ansible jobs to run sudo commands.
Adding Rundeck Jobs
"Jobs" are pre-defined scripts you can run on one or more nodes. To give a sense for what a job does, here's a screenshot of all of my current jobs:
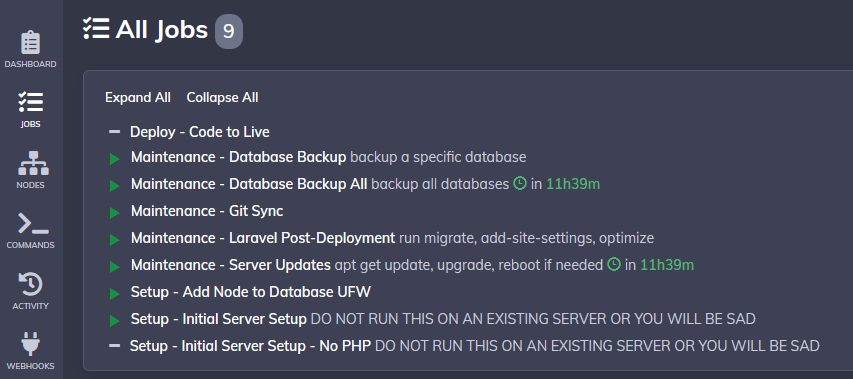
I'll walk you through one of them -- "Maintenance - Server Updates" -- to give a sense for how they work. We'll go tab by tab.
-
Open the first tab, "Details". Name your job and give it a brief description.
-
Open the third tab, "Nodes". This is where you will define which nodes the job is allowed to run on. We want this to be runnable on all nodes, so go ahead and put in
.*to indicate you want all nodes. You can leave everything else as default.

-
Open the second tab, "Workflow". This is where you write your script.
We don't need to input any options for this script, so you can skip the "Options" section. If you want to define user input, you do that from the "Options" section. For example, on my database backup script, I allow the user to define the name of the database they want to back up. -
Within the second tab, scroll down to "Workflow" and click "Add a Step". We will want to add a "Inline Ansible Playbook".

-
Now to write our steps:
- For the "Ansible binaries directory path", enter
/usr/bin. The installation of Ansible was covered by the Dockerfile I linked previously. - Copy-paste the contents of this file into the Playbook section.
- For future jobs you write, you may need "Extra Variables". This essentially lets you turn Rundeck variables into variables that Ansible understands. We don't need it for this job, so we can skip it.
- Under "SSH Connection", enter your Rundeck username as the SSH User. Select the associated key for SSH key stroage path.
- Under "Privilege Escalation", check "Use become privilege escalation. Everything else can be technically left as default, except select your Rundeck account's password for "Privilege escalation Password Storage Path".
- For the "Ansible binaries directory path", enter
-
You're done! Save the job and try to run it. Alternatively, you can schedule the job to run on a regular basis using the "Schedule" tab.
You can find some of the other jobs I've written in my LK scripts repo here, which should help get you off the ground with creating your own.
Emails (Mailcow)
When all I really need to do is send the occasional transactional (registration/verification) email, having a different SendGrid/Mailersend/etc for each website is both a) overkill and b) deeply annoying. I think SendGrid has insta-banned me at least four times now.
This section is applicable even if you're not running a full network of servers. If you're looking for a self-hosted alternative to your Lorekeeper emails, look no further!
I went with mailcow for my mail solution. Dockerized Mailcow is pretty brainless to set up by itself. The hard part is:
- Finding an IP that isn't blacklisted by all the spam lists out there
- Setting up the DNS records so your domain name doesn't get abused by spam bots
- Understanding what the hell is going on with various email-related lingo
Notably, mailcow is the only thing I didn’t put behind a Cloudflare tunnel (for now). The networking for email is fragile enough as-is, and Mailcow comes preloaded with a lot of the security things I'd be concerned about.
Getting an IP
Don't even bother with DigitalOcean, Linode, or any of the other big players. They're all blacklisted already. I personally ended up using Lunanode because it was suggested by some random dude on Reddit, but I know others who have used Mythic Beasts to great success.
Basically, spin up the VPS and check the IP at SpamRATS. If it's blacklisted, either destroy the VPS and try again, or attempt a different provider.
Mail DNS Records
For the DNS records, I followed this tutorial. Just in case that gets deleted at some point, I'll also document it here.
Note: if your domain name is through Cloudflare, disable the proxy on ALL of these records. You want it to show a gray cloud and “DNS only” next to the domain.
The domain name I’m using in my examples is placeholder.com and an IP of 1.2.3.4. Replace with your own domain and IP!
Standard Records:
| Type | Name | TTL | Value | Preference/Priority |
|---|---|---|---|---|
| A | default |
1.2.3.4 |
N/A | |
| CNAME | autoconfig |
default |
mail.placeholder.com |
N/A |
| CNAME | autodiscover |
default |
mail.placeholder.com |
N/A |
| MX | @ | default |
mail.placeholder.com |
10 |
Security Records:
| Type | Name | TTL | Value |
|---|---|---|---|
| TXT | @ |
default | v=spf1 ip4:1.2.3.4 -all |
| TXT | dkim._domainkey |
default | We will update this later after Mailcow gives us the value. |
| TXT | _dmarc |
default | See below. |
DMARC Records
I think you only really need one DMARC record, but you can collect them like Pokémon if you want. My logic was that verifying my domain through a lot of different methods can’t hurt.
- It’s a pain but you should sign up for Dmarcian. It might complain about your SPF records (it keeps complaining about mine…) but as long as you get the DMARC record from there, you’re good.
- Postmark’s DMARC service is extremely easy to get rolling.
- I saw a dude on reddit suggest that adding things like Google’s Postmaster tools and Microsoft's (SNDS) Smart Network Data Services can help them trust your mail server, so I went ahead and signed up for those too.
- SNDS doesn’t actually add a DMARC record, but it’s similar purpose so that’s why I mentioned it here. You’ll need to set up a postmaster@yourdomain.com account, so you can set up SNDS at the end.
Installing Mailcow
Honestly, you should just check out their official documentation (or the above link I sent). I might write up a more detailed tutorial at a later date, but this is getting long enough as-is.
More or less you'll just clone the repo, run the necessary ./generate_config.sh, and then be well on your way. Please note that the tutorial I linked uses the "old" notation for docker compose. Just change any commands from docker-compose to docker compose without the dash.
Some notes:
- I lump everything under the same domain name. By default a single domain has 10 mailboxes, but you can increase that.
- Make sure to update your DKIM record! It’s under System -> Configuration -> Options -> ARC/DKIM keys. Copy/paste the entire value into the DKIM record (starts with
v=DKIM1;) that we set up previously.
The Deployment Saga
I tried to get Rundeck to work for deployments. I really did. The problem is that the webhooks were unreliable -- I set it up to trigger a webhook on every push to Git, but a lot of the time, it would be slow to kick off and get out of sync with whatever linting, etc was happening via Git Actions. I believe Rundeck Enterprise would have solved a lot of my problems, but again, I'm one solo developer on a budget.
In retrospect, I probably could've set up all the CI/CD (continuous integration/continuous deployment) to be through Rundeck, including tests and linting. The problem is that it would've been a completely bespoke solution that I just did not have anymore time left to finagle.
On the other hand, deployments via Git are a problem that has been solved for a long while. It's usually the preferred method for solo developers or other small projects, and for good reason. It's easy to set up, and doesn't tend to break.
...and that's what I would have done, if I hadn't run into endless issues getting self-hosted Forgejo runners to share workflows between repositories. At the time of this writing, there's a bug in the Gitea and Forgejo runners where shared workflows just don't work, and I needed that if I was going to streamline my CI/CD process at all. (Notable, Woodpecker CI does NOT let you execute workflows manually, which was a dealbreaker for me. Also the GitLab guy is a massive loser who supports fascism so moving there wasn't a solution either.)
So, for now, all of my CI/CD pipeline is executed in GitHub and uses git hooks for deployment. For my CI/CD, it's just the linting that ships with core Lorekeeper. Every time I push to my website(s), I just do it via the command git push github main || git push site main. This pushes/pulls from GitHub first to grab the latest linted code, then pushes to the site.
Could this be better? Sure, I'm sure there's a solution out there somewhere that would solve my needs. Was it worth digging any further past this point? Not really. Once Forgejo/Gitea fix their runners, I'll probably move my CI/CD to be self-hosted, and then I can see about changing my deployment methods from there.
Conclusion
And that's my entire pipeline! As you can see, it mostly boiled down to figuring out how to shove everything in Rundeck. If you ever want to try a similar multi-Lorekeeper setup and figure out ways to optimize the process, let me know! I'm pretty much chronically in the Lorekeeper discord, so you can always ping me there.
Thanks for reading!